Here’s a great Scroll Saw project for those late Summer/early Fall craft fairs
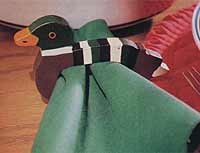
Fire-up your Scroll Saw (and Bandsaw) and get started on these quick, easy-to-make Duck napkin-holders. All you’ll need is some wood, a roll of Double-stick tape, a few bucks worth of paint and a little time.
Begin by deciding what type of stock you’re going to use. We selected poplar for ours because of its straight grain, easy working ability and the fact that we had planned to apply a filler and paint the finished ducks, anyway. Another option would be to make them out of attractive hardwoods such as cherry, walnut or oak and stain them or finish them with a natural oil instead of painting. It’s your choice.
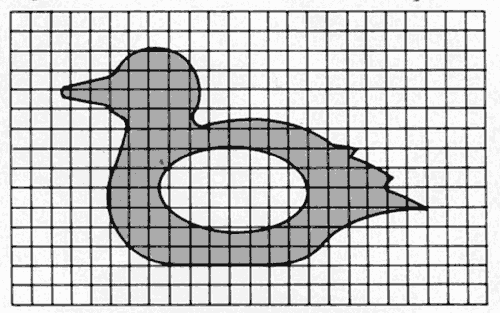
Start by transferring the pattern from the drawing onto a piece of 7/16″ thick stock. Or even better, print the pattern out and make photo copies to the size you need. Decide how many ducks you want, and make one photocopy for every four ducks (if you’re planning to pad saw them out, four at a time). Fasten your four-blank stacks together using Double-stick Tape, then merely glue a fresh pattern on the top blank in each stack (using artist’s spray-on glue) and go to work. Much faster and easier.
Note: This is really a simple enough project idea that you could just as easily choose the profile of a completely different animal or virtually any object from the myriads of scroll saw patterns available today. If you can’t find a pattern you like, just make your own by tracing outlines from magazines, then photocopying them to the sizes you want.
Next, drill a through hole for your scroll saw blade in the center cutout area of each stack and start sawing. If you also have a Bandsaw, you could probably work more efficiently by bandsawing the outside shape and scroll sawing the inside cutouts.
Finally, use your choice of Drum Sander, Disc Sander and Strip Sander to smooth the surfaces and edges. Apply a good coat of sanding sealer, then paint and top-coat to your liking. Pretty simple.