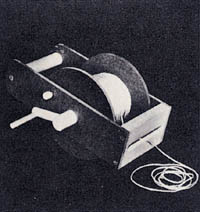
Here’s a great little kite string winder . . . sure to generate some high-flying profits at those upcoming Spring shows and craft fairs
On any blustery Spring afternoon and you’re likely to find it polka-dotted with kites of all sizes, shapes and colors. And down here on the ground, you’re just as likely to find a bunch of folks (young and old alike) struggling to control the strings of those kites (usually unsuccessfully) using everything from a tomato can to a fishing pole.
This simple kite string winder will solve the problems either of these primitive approaches present . . . and put some extra cash in your pocket, too.

Step 1: Start by turning a series of large, 3-1/2-inch diameter dowels for the spool centers on your lathe. You’ll want each finished dowel to be 3-1/2-inches long, so we suggest that you turn six or seven dowels at once from a 27-inch” or 28-inch long blank, then cut them apart.
Step 2: Next, lay each spool center on your drill press and bore a 1-inch diameter hole through their centers for the axles.
Step 3: Make two 6-1/2-inch diameter x 1/4-inch thick spool sides for each winder. Drill a 1-inch diameter hole in the center of each and attach to the sides of your spool center with glue and some small brads.
Step 4: Cut out the two sides and top.
Step 5: Drill the 1-inch dimete. axle holes and 1/4-inch diameter locking pin hole in the sides.
Step 6: Cut all the dowels for the crank handle, holding handle, locking pin and axle locking dowel.

Step 7: Since the tops must be routed and their small size makes them difficult to hold during this process, we suggest that you work with a strip of four tops by cutting a piece of stock 3-inch wide x 3/4-inch thick x 18-3/4-inches long.
Step 8: Using a 1/4-inch straight router bit on your MARK V Router set-up or router table, make the through cuts for the string guide slots across the centers of the four tops.
Step 9: Switch to a piloted 1/4-inch rounding-over router bit (bits with bearing pilots won’t work for these cuts) and, working from each side, round-over the edges of the slots to allow the string to slide through smoothly without snagging.
Step 10: Drill the various axle/handle components as indicated and glue them together.
Step 11: Assemble the sides, top and holding handle with glue and flathead wood screws, as shown.
Step 12: Insert the assembled handle through the sides, washers and spool, as shown. Once positioned so the spool turns freely, drill a 1/4-inch diameter hole through the spool and axle (don’t go all the way through the opposite side) to accept the axle locking dowel. Glue into position.
Step 13: Drill the 1-inch deep by 1/4-inch diameter spool locking hole through the side with the crank handle and into the spool.
Step 14: Put the 1/2-inch diameter locking pin in your drill chuck and turn down 1-inch of it to 1/4-inch diameter, so it will slip into the hole you drilled in Step 13, above. Drill a small 1/8-inch hole through the large end of the pin and tie a short piece of kite string through this hole. Drill another 1/8-inch diameter hole in the winder side near the holding handle. Tie the other end of the string to this hole to prevent the loss of the locking pin.
Step 15: Sand and finish to suit.
A Note About Size – The secret to the functionality of a kite winder lies in the diameter of the spool. The larger the spool diameter, the faster its user will be able to retrieve the kite…with fewer turns of the crank. For that reason, serious flyers who enjoy sending their kites great distances may prefer a larger diameter spool.
No problem. Just multiply the dimensions shown here by 1.5 — 2 — 2.5 — or even 3 to produce a variety of different diameter spools to cover all categories of flyers.