Displays and Organizes Spools
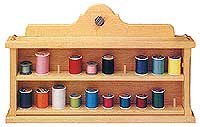
If you or your spouse has ever sewn…or knows someone who sews quite often, you probably realize that keeping an ever-growing collection of threads handy, organized and within easy reach can become a chore. Often, some of the more infrequently used colors virtually disappear into the bottom of the sewing basket…possibly never to be seen again.
You’re not alone. It’s a problem faced by sewers the World over…and the main reason why an attractive, functional Thread Holder like this one will have so much market appeal. This unique holder places up to 20 spools of thread in plain sight and shows at a glance which colors are available and how much thread is on each spool. It’s sure to be a great addition to anyone’s sewing room.
We made our Holder from pine, but virtually any wood will work quite nicely. It can also be easily modified to hold more spools by increasing its width or adding more tilting shelves. If you’d like to have longer shelves or more of them, just extend the length measurements of the Shelves (C) and the height of the Sides (D) and Lower Back (F) by 3-1/2″ for each additional shelf.
LIST OF MATERIALS
(finished dimensions in inches)
A Top (1) 3/4 x 2-5/8 x 19-3/4
B Bottom (1) 3/4 x 2-5/8 x 19-3/4
C Shelves (2) 1/2 x 1-3/4 x 17-1/2
D Sides (2) 3/4 x 2 x 7
E Upper Back (1) 1/2 x 4 x 16-1/8
F Lower Back (1) 1/4 x 7-1/2 x 18
G Dowel Pins (20) 1/4 dia. x 1-3/8
H Dowel Plugs (12) 3/8 dia.
Hardware
#8 x 1-1/4″ Flathead Woodscrews (8)
#10 x 1-1/4″ Flathead Woodscrews (4)
Metal Washers (1)
Cutting The Stock
Begin by thickness planing and table sawing the Top (A), Bottom (B), Shelves (C), Sides (D) and Upper Back (E) to size as per the List of Materials. Also cut the 1/4″ diameter x 1-3/8″ long Dowel Pin Thread-Holders to length.
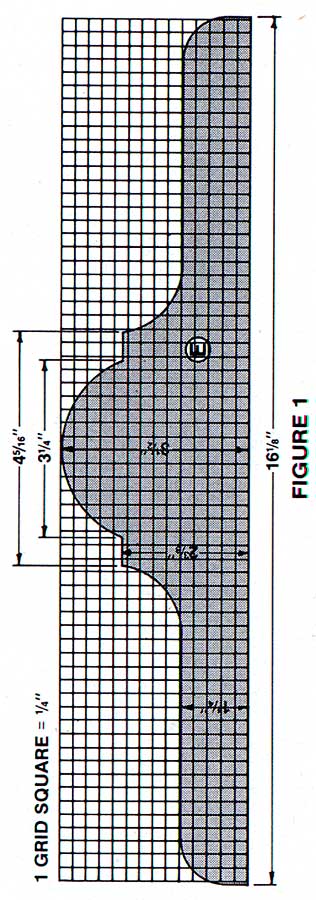
Transfer the pattern for the Upper Back (E) shown in Figure 1 to your stock and use a Bandsaw to cut out the profile. To save time when making multiples, temporarily attach up to five or six blanks together using Double Stick Tape and Pad Saw them all at once.
If you’re Pad Sawing, separate the Backs into stacks of three and use a combination of a Drum Sander and a Strip Sander to sand the profiled edges smooth.
Drilling The Peg And Assembly Holes
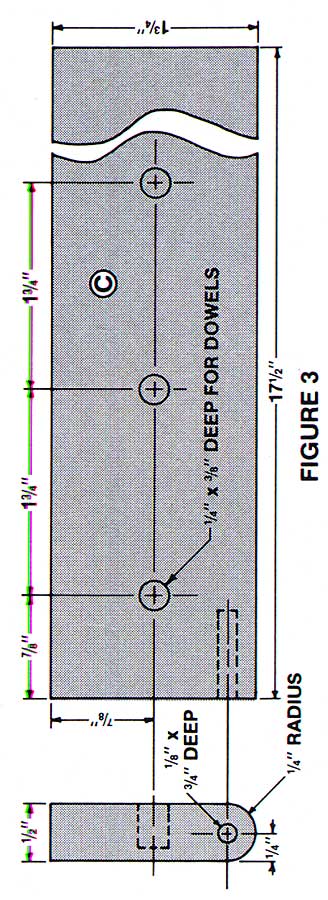
Mount a 1/4″ diameter Brad Point Bit in your Drill Chuck and set your depth-of-cut for 3/8″. Drill all the holes for the Dowel Pins (G) in the Shelf (C) tops following Figure 3 for proper hole positioning. You can speed this task by attaching a strip of masking tape to your Rip Fence and marking a series of vertical lines on this tape for use as a guide for faster hole positioning.
Change to a 3/8″ diameter Bit and drill the eight 1/2″ deep counterbore assembly holes on the outside of the Top (A) and Bottom (B), as shown in Figure 4. Complete those holes by drilling the through screw pilot holes with a 5/32″ diameter bit.
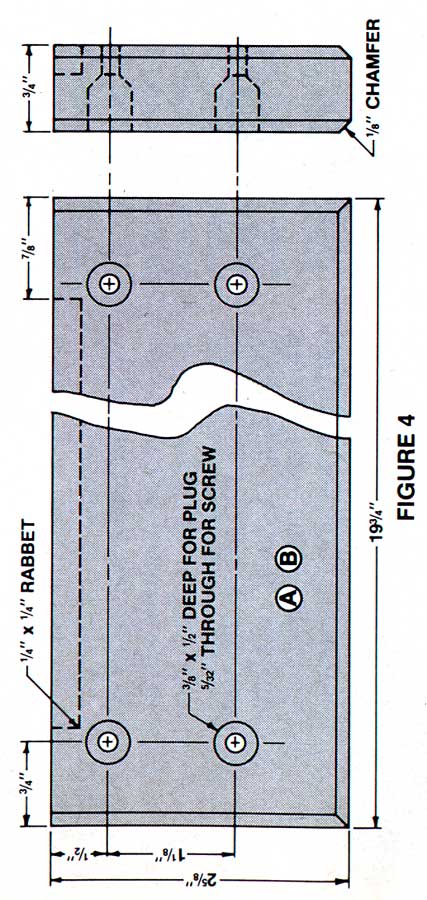
The Sides (D) will be assembled 3/8″ in from the ends of the Top (A) and Bottom (B)…and they must also be flush with the back edges of the Top (A) and Bottom (B).
Making The Final Cuts
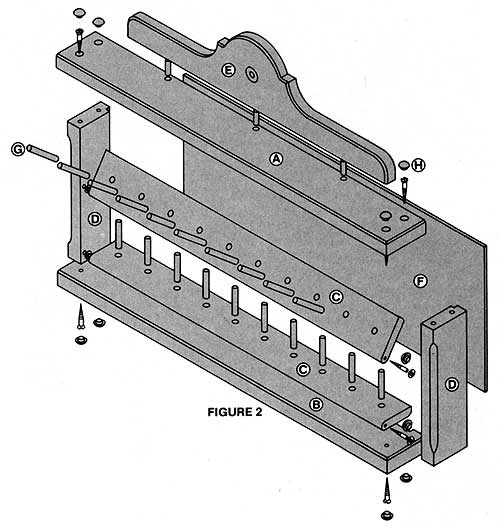
Assemble the Top (A), Bottom (B) and Sides (D) using #8 x 1-1/4″ wood screws. DO NOT GLUE. Then, using a Router Set-Up with a 1/4″ Straight Bit, rout a 1/4″ wide by 1/4″ deep rabbet around the back of the assembled framework to hold the Lower Back (F), as shown in Figure 2. While still assembled, take the finished measurements for the Lower Back and cut it out of 1/4″ plywood.
Disassemble the Top, Bottom and Sides. Using a Router Set-Up with a 1/4″ Router Chuck and a Chamfering Bit, Bevel the (front edges only) of the Sides (D). Next, bevel the underside rear edge of the Shelves (C) so they won’t bind against the Lower Back when tipped forward. It’s also a god idea to bevel the edges of the Top (A), Bottom (B) and the Upper Back (E) for a pleasing appearance.
Change to a 1/4″ Round-Over Bit and rout the front edges of the Shelves (C).
Next, drill and countersink 1/8″ diameter holes in the ends of the Shelves (C) and insert #10 x 1-1/4″ wood screws (See Fig. 3). Drive the screws in to the ends of the threads, then cut off the heads about 1/4″ from the shelf end using a hacksaw or bolt cutter. File the screw ends smooth.
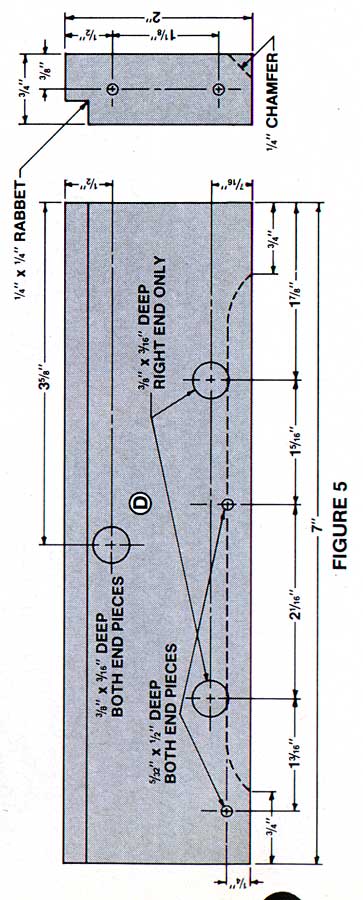
Drill a 5/32″ diameter hole in the Sides (D) to accept the metal screw/pegs you have mounted in the Shelf ends. Now, drill the 3/8″ diameter holes for the Dowel Plugs (H) that the Shelves will rest against when tilted forward (See Fig. 5).
Finishing And Assembly
Sand all pieces smooth. Before applying the finish, glue a metal washer to the Upper Back (E) to hold a refrigerator magnet. It will come in handy for holding sewing needles and pins.
We used a clear coat of polyurethane for a natural-looking finish. But you can stain first, if you like.
The only glue used during assembly was for securing the Dowel Pins (G) in the Shelves (C)…the Dowel Plugs (H) to cover the screw heads and for the Shelf tilt stops…the Lower Back (F) to the Top (A)…and the Bottom (B) and Sides (D).
Follow the exploded diagram (Fig. 2) for proper assembly of the Thread Holder.